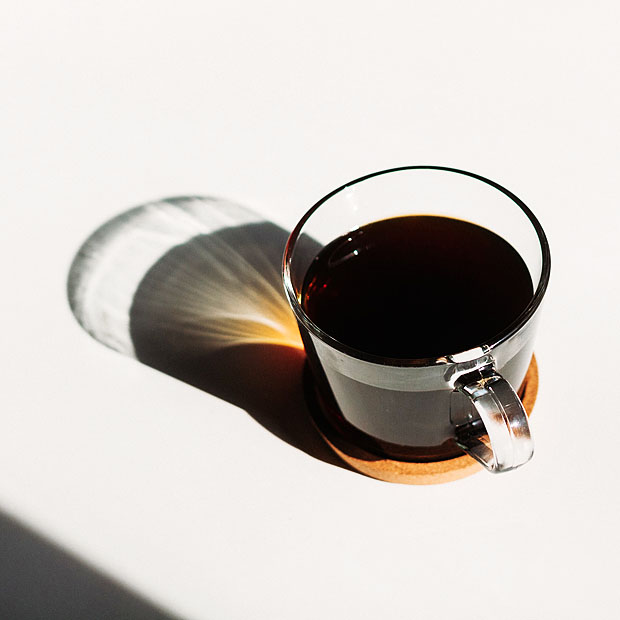
I only became a regular coffee drinker after I finished my PhD in chemistry and got a real job. The reason was that I had a 1 hour commute and I needed the caffeine to stay awake and focused. Prior to this I was more of an occasional coffee drinker. Fast forward 15 years and I’m still a regular coffee drinker, but I have also come to appreciate the flavors of coffee. My commute is shorter now and during the summer half-year I can even bike, so normally my first cup of coffee will be at work. The biggest change however is that I have come to appreciate lightly roasted and single sourced specialty coffee. There is a very active third wave coffee scene in Scandinavia, and with a monthly coffee subscription from Kaffebox I get a shipment each month from different coffee roasters in Norway, Sweden and Denmark (if you use this link to order both you and I get a rebate).
The year 2020 was extraordinary in many ways, and it also affected my Christmas and New Year holiday. With social interaction reduced to a minimum there was more time for reading and contemplation – and coffee. In December I enjoyed a Coffee Advent Calendar from Kaffebox – 24 days of blind tasting coffee was great fun. You either jump for joy because you correctly guessed the origin of the beans or the type of processing, or you realize that some coffees are hard to distinguish and that processing can greatly affect the flavor of coffee. When you win, you win – when you lose you learn. Lots of fun anyhow! I had also borrowed a couple of coffee hand grinders to play with as an addition to my trusty old Rancilio Rocky. This threw a lot of uncertainty into my daily coffee routine and it felt like panta rhei – everything floats! Frustrating a first yes, because I came to realize how bad I was at making good pour over coffee in a reproducible and controlled way. The good thing was that it prompted me to read and learn. Little did I realize how deep a rabbit hole I should fall into.
It’s not the first time I dive into the world of extractions here at Khymos, whether using water, oil or ethanol, or brewing beer. I’ve also previously dipped my pen into coffee when writing about Norwegian egg coffee, the convenience of Aeropress when on holiday, adding salt to coffee and testing this with Tim Wendelbo, and espresso extraction in general. But to be honest – I wasn’t even scratching the surface compared to what I’ve learned from reading up on all aspects of coffee the last month and a half. The amount of information available now is mind boggling! A lot has happened during the last 10 years, especially within pour-over and drip coffee! We are also beginning to see a substantial amount of scientific publications which are relevant for brewing of coffee in cafés and at home. In the following I hope to highlight a little of what I’ve learnt recently as well as some new ideas, and there will certainly be more than one blog post.
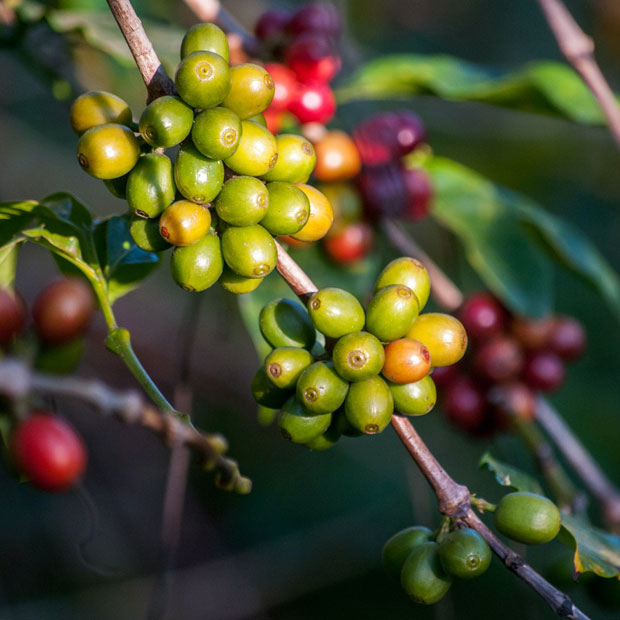
If you trace a cup of coffee all the way back to its origin as a fruit on a Coffea arabica shrub, it’s extremely fascinating how many people and processing steps exert an influence on the quality of your beverage. Most of this is outside your control, but you can choose to buy high quality beans, roasted by enthusiasts, processed by skilled craftsmen and grown by dedicated farmers. It’s only when you have a bag with coffee beans sitting on your kitchen bench that you can start to make a difference. Below are a couple of parameters that you can influence and some of the things that I picked up along the way.
Brew ratio (BR)
The brew ratio (BR) is defined as the amount of water relative to the amount of coffee. A typical starting point is 60 g of coffee for 1000 g of water which equals a BR = 1000/60 = 16.7. Just like the Baker’s percentage is a convenient way of remembering the flour-to-water ratio for pizza dough as a single number, the brew ratio is the simple way to remember a “recipe” for coffee. Brew ratios for black coffee normally fall in the range 15-25. BR is also very convenient if you want to scale your recipe up or down.
Total dissolved solids (TDS)
I have discovered that I am very sensitive to coffee that is too strong. In this case, adding just a little hot water can do wonders. Sometimes it feels like the coffee goes from “too strong and bitter” to opening a box full of fruity flavors. It’s nice when it works out this way, but it’s not a practical way of exploring coffee to add water (which you afterwards cannot take out if you regret). This is where total dissolved solids (TDS) enters the scene. Long story short, this is the easiest way to measure the strength of coffee. No, TDS does not measure how good your coffee will taste. But yes, it can tell you if the numbers are way off.
The whole point of using hot water to extract ground coffee is to dissolve stuff out of the grounds and into the water which ends up in your cup. The amount of solids can be measured, and the traditional gravimetric way to do it would be to weigh an amount of coffee beverage and evaporate it to dryness. The residue left behind would be the dissolved solids that then could be weighed. One could argue that volatile molecules would evaporate together with water, and while this is true, it has limited consequences for the weight of the residue (more details on this in a later blog post). It is not practical to evaporate all the water from a cup of coffee. You could scale it down and for instance evaporate only 500 mg of coffee on a pre weighed filter paper. The challenge then however is that the typical amount of dissolved solids in a normal cup of coffee is in the range 1.2-1.5% (= 12-15 grams per liter), which would correspond to 6-7 mg of dry matter for the 500 mg sample. In order to even think about doing this, you would need a balance with at least a 0.0001 g accuracy. These are not cheap. You do not want to spend your hard earned money on this.
Fortunately there is a better way to measure the solids. Light travels at different speeds in water and air. This is why a spoon or a straw in a glass of water seems to be bent or broken. Light travels a little faster through pure water than through coffee, and this can be measured quite easily. The cheapest way is with an analogue hand held refractometer. You can get one with a %Brix (°B or Brix) scale and convert to percent total dissolved solids (TDS) by multiplication with 0.85 (%TDS = %Brix x 0.85). This conversion factor can easily be verified using instant coffee which can be weighed accurately into a given amount of water! With a handheld refractometer you will be able to read %Brix with a resolution of 0.0-0.2 (see picture below). This means that the range from 1.4-1.8 %Brix about covers the range for normal coffee (1.2-1.5 %TDS). In other words: You can confirm whether you are within the typical range or above/below it, but you can’t use the handheld refractometer for fine tuning. When you are beginning to explore coffee and wonder if you are confusing coffee strength with bitterness or astringency, the refractometer will give you a hint when the strength is too high. What the TDS number also tells you is that a normal cup of black coffee is more than 98% water – that is sometimes hard to believe!
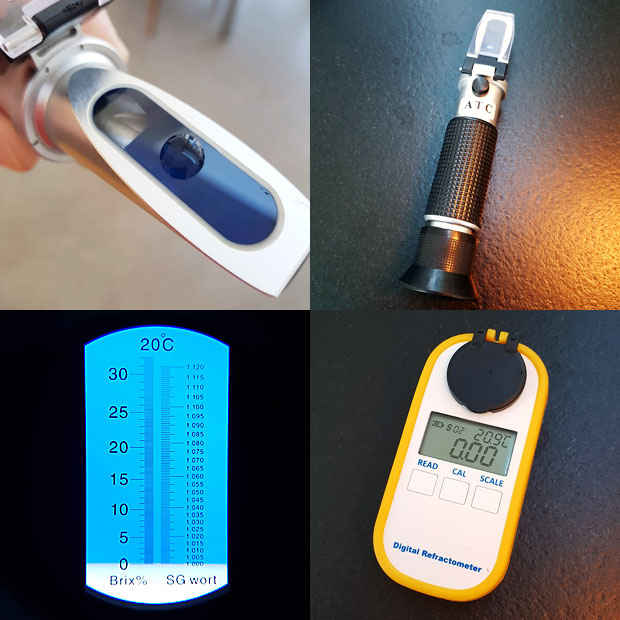
With digital refractometers accuracy is better, and there are even dedicated models for coffee with a 0.01 °B readout and automatic conversion to TDS, but these are quite pricey. Until recently I only had a handheld refractometer, and I would highly recommend it because it has multiple uses in the kitchen. If making a raspberry sorbet for instance you can dial in the correct amount of sugar to add by aiming for around 26 %Brix as an example (so make sure you get a refractometer with a range of 0-32 %Brix). If you are into brewing beer you can just as well make sure that the refractometer also has an SG scale (specific gravity). Since the actual TDS in coffee is so low, the equipment otherwise used for measuring SG in beer brewing (such as a hydrometer) is not of any use for measuring coffee – it’s simply not accurate enough.
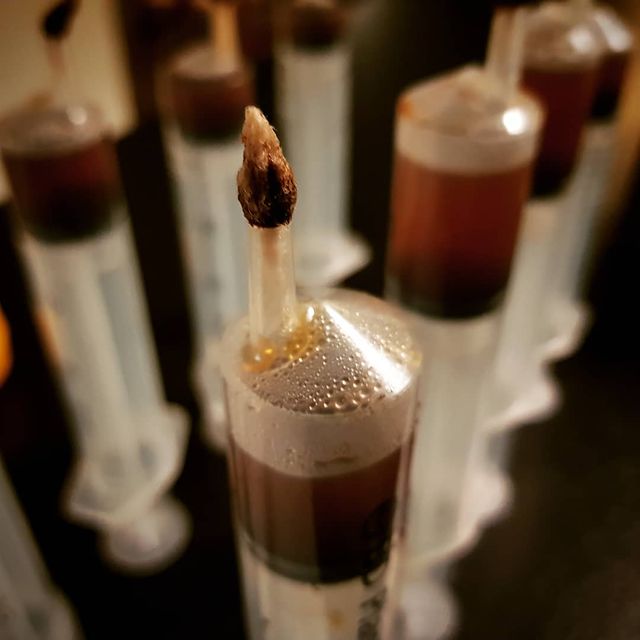
When measuring TDS of a coffee during extraction the samples need to be hot filtered in order to stop the extraction. I use plastic syringes with a little piece of cotton to achieve this (see picture below). The coffee needs to cool completely before the TDS can be measured with a refractometer. To minimize evaporation I leave the cotton as a plug. You can see water condensing inside the syringe as the sample cools. This water needs to be redissolved in the sample. Make sure that the sample does not touch the dried cotton plug as that could add additional dry matter. When measuring I use the plunger to deliver the required amount of sample, eliminating need for additional pipettes. Syringes are cleaned, dried and reused. All in all it’s a cheap DIY method which minimizes waste and allows for a fast workflow while avoiding the cost of lab grade syringe filters.
Extraction yield (EY and EEY)
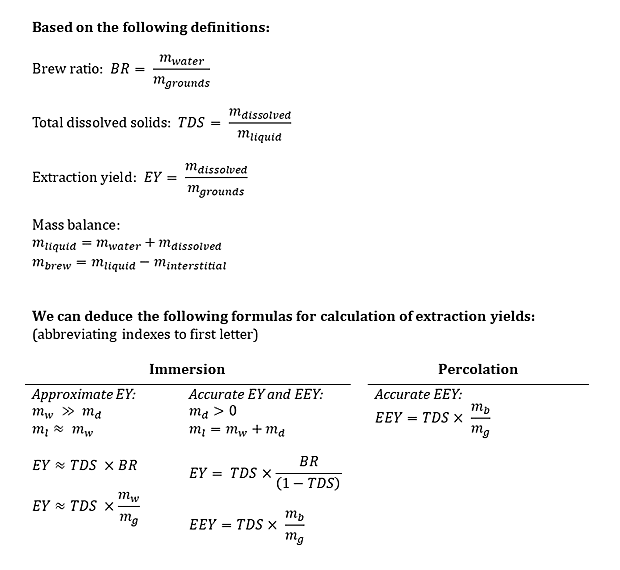
Once the concentration of total dissolved solids (%TDS) has been measured you will want to calculate the extraction yield. To obtain the actual yield the measured solids are divided by the mass of coffee grounds you started with. The amount of solids in grams is given as %TDS multiplied by the liquid mass. Since some liquid is left in between the coffee grounds (the interstitial liquid) this can get quite complicated in the case of percolation brews. I will therefore define two different extraction yields as follows:
- Effective extraction yield (EEY): Calculated from the amount of solids that make it into your cup. The liquid mass used in the calculation equals the mass of the brew.
- Extraction yield (EY): Calculated from the amount of solids that were extracted from the coffee grounds before the brew is filtered. The liquid mass is any liquid that could have made it into the final brew.
In an immersion brew the entire liquid mass has the same probability of ending up in the cup (we disregard the liquid inside the grounds). For a percolation brew however, the interstitial liquid arrived to late to the party and cannot make it into the cup. Therefore, according to the definition above, for a percolation brew EY = EEY. Think of it this way: the interstitial water in a percolation brew has never been mixed with what is in the cup, so this liquid mass should not be counted. In an immersion brew everything is mixed, meaning that the composition of the what is in the cup equals what is in between the grounds (we still disregard any liquid trapped inside the grounds). If you are familiar with extraction yield calculations you may notice that by using the definitions above I circumvent the whole problem of dissolved solids in the interstitial liquid of a percolation brew. Scott Rao and Jonathan Gagné amongst others have quite detailed blog posts discussing this complexity. I would love to hear what you think about my approach in the comments!
You may ask – why bother with EY and EEY at all? The effective extraction yield focusing on the cup is interesting from an economic perspective, whereas the extraction yield focusing on what has been removed from the grounds may say something about the flavor profile. In my opinion there are good reasons for using both methods for calculation of extraction yields. It may be easier to appreciate the difference with an example. I’ve shown the definitions of BR, TDS and EY below. Based on these definitions I’ve then derived formulas for calculation of approximate and accurate extraction yields for immersion and percolation brews.
Let us assume that you use 300 g water and 20 g coffee to obtain 250 g coffee brew in your cup. The brew ratio BR = 300 g/20 g= 15. You brew two cups of coffee – one by immersion and with a pour-over/percolation method. If we measure the immersion brew to 1.30 %TDS this means that mdissolved = 3.95 g. To calculate this you must remember that mliquid = mwater + mdissolved. There’s a feedback loop here, because mliquid is used to calculate mdissolved which in turn affects mliquid. If doing this in a spreadsheet you may get a warning about a circular formula – in that case make sure you allow for iterative calculations. If you disregard mdissolved you only get 3.90 g solids. The extraction yields can be calculated directly by dividing the mdissolved = 3.95 g (or mdissolved = 3.90 g in the approximate case) by the mgrounds = 20 g you started with. The approximate extraction yield can also be calculated directly with the formula from above: EY ≈ TDS x BR = 1.30% x 15 = 19.5%. If you do take into account that the solids extracted from the coffee bean mdissolved add to the mass of the brew, the precise extraction yield EY = TDS x BR / (1-TDS) = 1.30% x 15 / (100%-1.30%) = 19.8%.
If we focus on what’s in the cup, there are a total of mdissolved = TDS x mbrew = 1.30% x 250 g = 3.25 g solids in the cup, corresponding to an effective extraction yield EEY = mdissolved / mgrounds = TDS x mbrew / mgrounds = 1.30% x 250 g / 20 g = 16.3%. If the coffee is brewed by percolation, the fact that “new” water is added will typically give a higher measured %TDS in the cup. If for our calculation we assume it’s 1.35% TDS this means that there are mdissolved = TDS x mbrew = 250 g * 1.35% = 3.38 g dissolved solids in the cup. This amount of solids corresponds to an effective extraction yield EEY = mdissolved / mgrounds = TDS x mbrew / mgrounds = 1.33% x 250 g / 20 g = 16.9%. I’ve summarized the results in the table below for easier comparison.
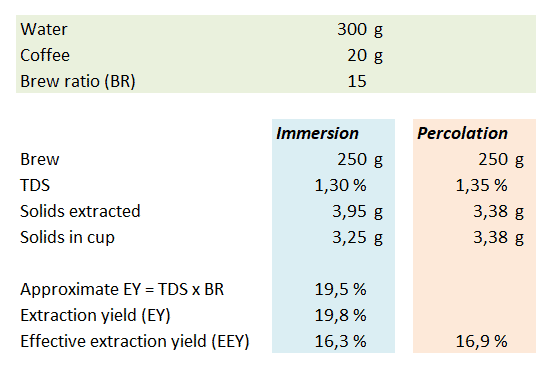
What the example shows is that the percolation method is better at getting the solids delivered to the cup, whereas the immersion method extracts more from the grounds into the liquid mass. The caveat is that not all of these solids are delivered to the cup. Regardless of how the extraction yield is calculated one should always specify which method is used. An interesting detail here is that the difference in amount of coffee extracted from the grounds (3.95 g vs. 3.38 g) explains why immersion and percolation coffee taste different. Considering the many hundred chemical compounds present it’s only fair to assume that if you extract 0.57 g more solids, then the composition of these will not be exactly similar to the 3.38 g that were extracted first.
While we are nitpicking the details of EY calculations: How do we handle evaporation? I must admit that so far I have disregarded it, even though it’s not uncommon to see several grams of water evaporate during a 5 min coffee preparation routine. It does however affect the brew ratio. Evaporation by the way also has a huge impact on temperature (see below). For practical reasons EY or EEY are always given on a pure weight per weight basis, not on a dry matter basis. Nevertheless, roasted coffee does contain about 1-4% water which should be considered for accurate yield calculation.
If you venture into measurement of TDS and calculation of extraction yields, consider that how accurate you weigh your coffee grounds and measure the TDS will affect the accuracy of your yield calculations. For a brew weight of 250 g an uncertainty of 0.02 %TDS corresponds to an uncertainty of +/- 0.25 g coffee at a 20% EY, and similarly an uncertainty of +/- 0.3% in EY for a 15.0 g coffee dose. If you use a handheld refractometer the TDS will be more uncertain, maybe around 0.1 %TDS. For a brew weight of 250 g this corresponds to an uncertainty of +/- 1.3 g coffee at 20% EY which is quite significant, and a corresponding uncertainty of +/- 1.7% in EY for a 15.0 g coffee dose.
Grind size and particle size distribution (PSD)
A roasted coffee bean needs to be ground before coffee can be extracted. The challenge is that when a bean is ground or crushed, it shatters into several pieces – some large boulders and a great number of smaller pieces where the smallest are referred to as fines. There doesn’t seem to be an agreed definition, but recent scientific papers draw the line at 100 µm. Ground coffee does not display a single, uniform grind size. If you took the tedious job to group and sort ground coffee into groups of similar sizes you would find that there is a distribution. Luckily there are tools and machines to do this. At home and in a café this can be done mechanically with a sifter, and notably the company Kruve are making sifters specifically for coffee. If you search for “mesh test sieves” you can find cheaper alternatives from China. In a chemistry lab or in the coffee industry the particle size distribution (PSD) is measured using equipment such as a MicroTrac, Sympatec or a Lasentech – just to mention a few. A simpler approach is to spread coffee out on a white surface, take a picture/micrograph and measure the diameter of the particles relative to a known reference. Jonathan Gagné has written a Python app for this. Beware though that the finest/smallest coffee particles tend to stick to each other as well as to larger particles. Because of this you will easily underestimate the amount of fines.
The tricky thing about a particle size distribution is that you can display distribution in different ways, for instance by volume, by surface area or by the number of particles. It’s most common to visualize the volume distribution (see figure below, top trace). This is unfortunate, because even though “correct”, it doesn’t convey the actual effect the fines will have. If instead of volume we show the number of particles the picture becomes very different (middle). Suddenly it becomes clear that even though the volume of fines is low, there are so many fine particles present. But even this in a way is a misrepresentation, because the actual coffee extraction takes place via the surface of the coffee particles. The surface distribution can also be visualized (bottom), and in my opinion this gives the most precise picture of what to expect from the extraction. For the example shown it illustrates that more than half of the extraction takes place on the surface of particles smaller than 100 µm. You may ask whether this is important, but consider that preliminary results from Matt Perger at Barista Hustle suggesting that coffee particles are only extracted to a depth of 100 µm! This means that larger particles have a core which is not extracted at all. This is essentially “wasted” coffee. The larger particles still play an important role though in making up a filter bed, thereby greatly reducing the draw down time (i.e. the time needed to separate your brew from the grounds by gravity filtration).

In the attempt to make “better” coffee the big question is what particle size and distribution is ideal? For pour over coffee the agreement seems to be that narrow particle distributions are favored as these give better/higher flow rates and less clogging. This really boils down to the amount of fines.
If you throw whole beans into hot water not much will happen. And if you grind your coffee as fine as possible your coffee will be ready and extracted in no time, but unless you have reduced the coffee dose you will get a strong and bitter coffee. With many fines it’s also more difficult to separate the brew from the grounds. Surely the ideal grind must be somewhere in between. The challenge is that grind size and particle distribution affect both the extraction but also the time it takes for water to filter through a bed of coffee in a typical pour-over/percolation method, so the degree of extraction is doubly affected. With too many fines a filter can become completely clogged.
The choice of grinder has a huge influence on particle size and distribution. Cheap knife grinders will produce a terrible amount of fine particles, so stay clear of these. I do have a knife grinder, but I use it exclusively for grinding spices. Coffee grinders for use at home and in cafés are typically burr grinders. These come in various materials, geometries and sizes – from relatively cheap hand grinds with a 20 g capacity to professional grade grinders for cafés capable of grinding through a decade of coffee consumption for one person in a single day. If you move on to large scale industrial grinds you will find cylindrical grinders which produce extremely narrow particle size distributions. From a pure grinding point of view, buying filter ground coffee could probably give you a better cup of coffee due to a more uniform grind size compared to what you can achieve with smaller scale equipment. There are many other reasons of course for sticking with whole beans of specialty coffee. To preserve the coffee and prevent oxidation filter ground coffee is packed in bags with an inert atmosphere (normally nitrogen, additionally carbon dioxide is released from the beans upon roasting). This works well, but once you open a bag and it’s exposed to oxygen it will start to oxidize, the oils will go rancid and the flavor becomes stale. This happens on the order of days!
A question that came to my mind is whether grain mills used by home brewers could be of any use, for instance to achieve a more precise and gentle pre-crushing prior to a final grind in a burr grinder. In order to check this one would need to somehow measure the grind size, for instance with a Kruve sifter or by image analysis. I believe double grinding could also help narrow the PSD if you first grind very coarse followed by a finer grind. This way you’re not trying to reduce the size too much in a single step. Experiments like this are simple to do, but to properly evaluate the results you would want to measure the PSD which is not trivial.
There is some discussion around pros/cons of flat burrs and conical burrs. Higher end machines tend to use flat burrs with larger diameters. Within flat burrs there are different groove designs to choose from, some which are specifically designed for espresso (where a certain amount of fines is desired/needed) and pour-over brews (where fines are not desired). As far as I know all hand grinders use conical burrs since these are more compact.
There are many opinions about grinders, but surprisingly few are grounded in science, either based on measured particle size distributions or properly collected sensory data. For pour over it seems that choice of grind size to some extent is determined by the draw down time. You would normally want to use the finest grind possible which still allows for a sufficient flow rate (i.e. avoiding clogging). The Aeropress coffee maker circumvents this by allowing the extraction to be stopped at a desired time by a pressure filtration.
Freshness of beans
This is simple – use freshly roasted beans! Store beans in an airtight bag and try to remove as much air as possible before closing the bag. Once a bag is opened the beans are exposed to oxygen and the quality will start to decline as compounds are oxidized and thereby giving rise to stale flavors. Only grind what you need. Just like grinding coffee allows you to extract solubles with water, the large surface area make these very same compounds accessible to oxygen in the air. Chemical reactions proceed slower at low temperature, this includes oxidation reactions. It is therefore advisable to store larger amounts in the freezer or a refrigerator.
Water composition
Water is not water. The taste of drinking water is influenced by the minerals present and carbonation, something that I have explored in quite some detail in multiple blog posts on DIY mineral waters (fun fact: my DIY waters were featured in the print edition of Wired in November 2012 and this definitely earned me some nerd points). It turns out that just like for brewing beer, tea and coffee also benefit from using water with a specific mineral content. The Excel sheet I made for calculating what mineral salts you need to add to your tap water in order to replicate specific mineral waters included some recommended waters for brewing of coffee, tea and beer. Very much has happened within the field of water for coffee since then, I realize that the calculator needs to be updated to reflect this. Jonathan Gagné’s excellent Coffee Ad Astra blog has some water recipes, but be aware that they are all based on distilled water. This makes sense if you live somewhere with hard water. I happen to live in Norway where water is very soft, so I will rather update my spreadsheet to calculate which salts I need to add to my local tap water. The spreadsheet allows you to enter values for whatever water you are starting with. I will publish the update here once I get it done.
Temperature
The solubility of chemical compounds varies with temperature. Normally the solubility increases with increasing temperature. Diffusion also increases with increasing temperature. In total, temperature will affect which molecules are extracted, how fast this happens and their solubility in water. In order to maximize extraction you therefore want to keep the temperature high, close to 100 °C. Keep in mind though that a maximum extraction is not necessarily what you want if you are aiming for the “best possible cup”. Even cold water can be used to extract coffee. For cold brews you intentionally lower the temperature and do the extraction in the fridge. Extraction is notably slower, so cold brews are typically done overnight. The taste differs from that of hot coffee since the extraction rate and solubility of compounds depends on temperature. Furthermore the temperature of the tasted beverage itself also affects the sensory profile, so when comparing the taste of hot brew and cold brew they should ideally also be compared at the same temperature. One reason for this is that at the perception of sweetness and bitterness is weakened as a beverage cools, whereas sourness and saltiness tend to remain the same.
Filter material
Paper is the most obvious material, but there are many metal filters around and I’ve also seen cloth and nylon filters – the latter two will however discolor upon use. Paper is by far the most effective at filtering out fine particles. The surprising thing is that we are able to sense the presence of microscopic particles as well as size differences. In chocolate, the “just notable difference” for particles size is in the range of 5 µm! A French press can taste “muddy” (also termed as “body” or “texture” if less pronounced) compared to the “clean” taste of a Chemex which has a very thick paper filter. The difference is also visible in the bottom of your cup with a French press leaving a significant amount of residue. Pricewise reusable filters of metal, plastic or cloth can be cheaper than paper, but compared to coffee even filter papers are very cheap, at least if you are drinking specialty coffee!
Besides the microscopic particles a paper filter retains oils which would otherwise be present in the finished coffee brew. In an espresso they can contribute significantly to taste and mouthfeel, so it’s worthwhile experimenting with metal filters if only as a benchmark to know what you are missing by filtering out oils. Metal filers are available both for standard cone drippers such as a V60, Kalita, and Melitta as well as for Aeropress.
Within paper filters there is a huge selection. First you need to choose between bleached and unbleached filters. Some may favor unbleached filters for environmental reasons, but from a flavor perspective there are many more residues in an unbleached filter that could potentially influence your coffee. If you really care about the environment removing meat from a single meal will have a greater impact than 1 year of coffee filters according to a quick back-of-the-envelope calculation – the details probably deserve a separate blog post. When cellulose is bleached you primarily remove lignin and hemicellulose – and thereby also the brown color. What is left behind is pure cellulose. Some may be worried about chlorine being used for bleaching, but today chlorine has more or less been completely replaced by other oxidizing agents used in the bleaching process.
There is a certain range of bleached filter paper available for coffee, but as a chemist I’m a little surprised that the range is not bigger. To get an idea of what I’m talking about, take a look at the range of Whatman filter papers. Filtration is a whole science by itself! Pore size will always be a trade off between flow and the size and amount of particles retained. There is a wonderful blog post over at the Coffee Ad Astra that compares filters from Hario, Chemex, Cafec, Aesir and Whatman, complete with microscopy pictures and calculations – highly recommended reading! Keep in mind though that only dry filters are studied. Once a filter is wet the cellulose will swell, and this may significantly affect the pore size and the actual filtration performance of the filter.
Summary
The parameters above are ranked according to the order in which I think you should explore them. The three first are linked, so I chose to join them together in a single bullet point.
- Brew ratio, total dissolved solids and extraction yield: If your coffee is too strong it will be screaming at you so loud that no other flavors can be heard. If the coffee is too weak, it’s like: Why am I drinking this? Keeping track of BR, TDS and EY is like having a GPS if you are in a new city with only map – it tells you where you are on the map! Even a cheap handheld refractometer can give you a rough idea of what your TDS is.
- Grind size and particle size distribution: Grind coarser for a quicker filtration and weaker coffee. Grind finer if your coffee is too acidic and you want a stronger and more bitter flavor. The tricky thing with grind size is that it also influences the filtration time. The amount of fines can have a very significant impact on your cup of coffee!
- Fresh beans: Use fresh beans and minimize exposure to oxygen! Freeze for long term storage.
- Water composition: The ions present in water as well as water pH affect extraction and taste of coffee.
- Water temperature: Faster extraction at higher temperature, but more is not necessarily better.
- Filter material: Paper is best for producing a clear cup, but also removes oils.
If you don’t have the parameters on top right, it won’t make much sense to move down the list. In my own experiments I definitely notice when beans age and get oxidized, but I haven’t started with water adjustments yet. Since I’m still playing around with 1 & 2, as well as testing some ideas I have related to the brewing process, it currently doesn’t make sense for me to tinker with the water. Adding to that, I’m also switching too often between many different coffee beans of different origin and processing.
You may ask why I didn’t put fresh beans on top? Well, if your brew strength and extraction is off, even the freshest beans cannot save you. I’ve found that a coffee compass like the one below from Barista Hustle can be useful when investigating the coffee landscape.

Valuable tips. This will be very useful for me to be healthier. Thanks a lot Martin.
This is an amazing, comprehensive guide to the intricacies of brewing the perfect cup of single source specialty coffee. Thank you for putting this together and sharing.
Wow, this is such a helpful guide. As someone who loves to drink filter coffee it was interesting to read brewing techniques in such a detail. Thanks for sharing!
Martin, have you looked into using density to determine your roast level and adjusting recipes accordingly.
Have a look at density.coffee
No – this is new to me! Thank you for bringing this to my attention.