One important aspect of molecular gastronomy is the application of scientific principles to food preparation in a normal kitchen. This can very well be illustrated by discussing the preparation of a steak. The surface of the meat needs to be heated to > 120 °C (250 F) for the Maillard reaction to take place at a reasonable rate. This gives meat much of it’s characteristic aroma. The interior of the meat however should not be heated to more than 50-65 °C (120-150 F) for a rare or a medium rare appearance. If the heat is provided by a frying pan with a temperature typically in the range 120-160 °C (250-320 F), the different temperature required for the interior and the surface of the meat can actually be quite difficult to achieve. Bringing the meat to room temperature before cooking by taking it out of the fridge 1-2 hours in advance helps. Also, half way through the cooking it’s advisable to let the meat rest on a plate to allow the heat to diffuse into the interior and to let the surface cool down a little.
There is however an easier way to make a perfect steak! In restaurants the method has been around since the 70’s and is known under the name sous vide (fr. under vacuum, more info on history of sous vide in this NY Times article). The meat is packed in plastic bags, vacuumed and put into thermostated water baths. This equipment is not (yet?) found in the average kitchen. So here is a simple DIY procedure. You just use a normal plastic bag, leave the meat in the water bath for 30 min (or longer) and then quickly fry both sides to generate the products of the Maillard reaction. You do need a thermometer though to control the temperature of the water bath, preferably one with a dip in probe.
1. Put the meat (I used a rib eye steak for this experiment) in a thick plastic bag. Only put one or two pieces of meat in each plastic bag – this ensures a greater contact surface with the water.
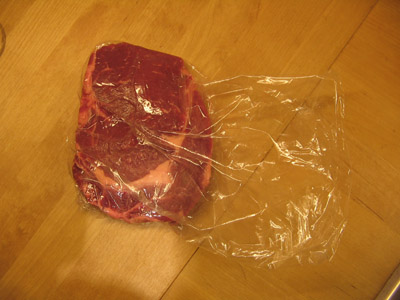
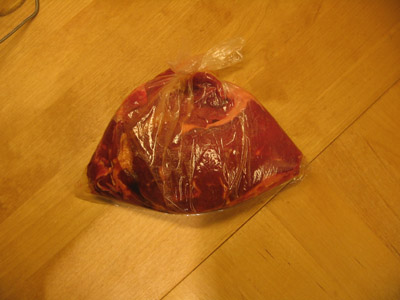
2. Add any spices you like (salt and pepper always works well – for the experiment shown I used curry paste, soy sauce and chili sauce in stead), press (or suck) out the air and close the plastic bag tightly by tying a knot (or use a zip-lock bag). You don’t want any water to enter the bag!
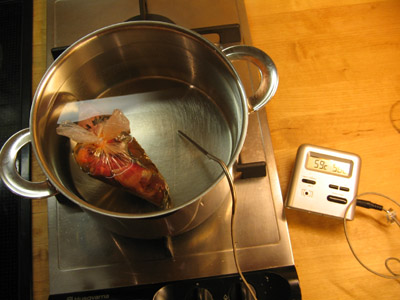
3. Heat a pot of water to the desired temperature (or use hot tap water) and place the plastic bag with meat in the water. Cover with a lid (not shown in the picture) to reduce heat loss. If you use a large pot of water it’s easier to keep the temperature constant. Also, it’s easier to control the temperature with an induction or gas stove top than with an electric plate since there is no additional heating once you turn them off. Regarding the temperature, start with 60 °C (140 F) and experiment from there (or check this table at Wikipedia for doneness temperatures of meat). You should leave the meat in the water for at least 30 minutes – more for a thicker cut. But the good thing is you can leave it for much longer (several hours) provided the temperature does not come above 60 °C (or whatever temperature you decided on). A convenient way to keep the temperature constant for a long time is to put the pan with water into the oven and use the thermostat of the oven.
4. Heat a frying pan, add a fat of you choice, remove meat from plastic bag and brown both sides of the meat. Since you take the meat directly from the water bath it’s already at about 60 °C. Therefore the browning is very fast.
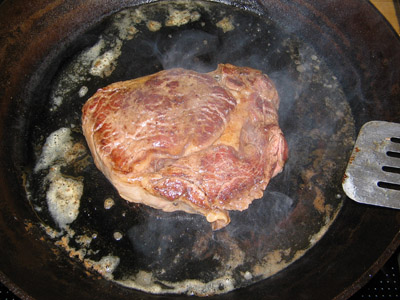
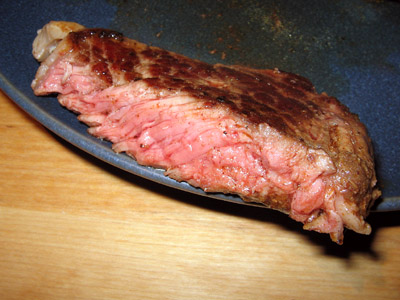
5. A temperature of 60 °C (140 F) gives the meat a pink interior. It’s succulent and juicy. The short frying gives it a nice browned crust and the chewing resistance is perfect. All in all a wonderful combination of taste, aroma, texture and mouth feel!
Note added January 2009:
Since I published this procedure the first time I’ve learnt a lot more about sous vide. The procedure above is a rather crude procedure, but it works. If the meat turns out grey you’ll need to turn the temperature somewhat down. If you’re interested in reading more about sous vide, the best discussion I know of which also includes important safety aspects is Douglas Baldwin’s “A Practical Guide to Sous Vide Cooking”.
Related posts:
A mathematician cooks sous vide
Sous vide cooking joy
Santa came early this year
Upcoming books on sous vide
Some of comments on the procedure:
– a thick-bottomed frying pan is preferable to avoid temperature drop in the pan, and thus too low temperature when you turn the piece of meat. Alternatively, you may use a flame torch.
– I cooked an entrecote for four hours this way, and carved/sliced it afterwards. It was very tender and perfectly cooked throughout the whole piece. Each guest could then fry his piece further according to taste. In fact, the post-cooking step was done with the blow-torch at the table, thus adding an experience dimension to the meal.
– The juices that eventually fill the bag (as little as possible, preferably) are excellent for making sauce/gravy. Really concentrated meat flavour.
– Electric plate is no problem as long as you start with water of the target temperature (i.e. 62-64 deg C for entrecote). You’ll just have to get to know your equipment. In our case, it’s ok to leave it at 1 and 2 of maximum 6. Large amounts of water ensures smaller temperature fluctuations. Temp. can also be corrected by adding cold/boiling water.
– If it is true that the most tender parts have less taste (being leaner), this method opens the possibility for making both tender and tasteful meat as cooking time can be prolonged without overcooking (i.e. the very tender entrecote which is supposed to be tasteful, but not as tender).
In my opinion, this is an example of true knowledge-based cooking that is readily adapted for home-cooking. An excellent example of MG for everyone.
Erik
Question: are all plastic bags ok for this, or should one use bags intended for cooking and higher temperatures (ref. volatile compounds and softeners/phtalates etc.)?
Superb. I am going to try this ASAP.
Thank you for some great additions there!
Regarding the plastic bags: are special “high temperature” plastic bags available?
I must admit that I know to little about phthalates. Phthalates and food has been discussed in the blog “A Natural Scientist” recently, and it seems that the exposure is quite low. I also note that there are several different phthalate structures – and they all have a different toxicity profile.
[…] 55°C – part II Well, I didn’t have a chance to get any pictures of it this weekend…too damn busy. But Martin from Khymos has put up a very interesting post about DIY sous vide cooking. You can do it at home with a plastic bag and a digital thermometer. It’s all illustrated with some nice pics so check it out here. […]
Nice, definitely an application of science in the home kitchen. Nice pictures too.
This is how we cook our main course meat at madeleines. Interesting question about plastic bags degrading at higher temperatures Erik. We use special vacuum bags that can be heated to 115°C without degrading. They are thicker and seem more durable than your average plastic freezer bag.
As to post-frying, the pan or griddle has to be as hot as possible. This is so that the Maillard reaction is created as quickly as possible without cooking the interior of the meat. At home I would probably use a smoking-hot grill pan with no fat. As you say Erik a burner would do as well, it just takes too long if you only have a mini-burner 🙂
Would this work on the BBQ for the final phase?
BBQ would be perfect! Since the meat is already done (and well tempered) the meat will only need a minute or so on each side for enough browning.
Combining BBQ and DIY “sous vide” is convenient if you host a large party, because you can have a large supply of meat that is already “cooked” sitting in a styrofoam box and waiting to be “blitz-browned” on the grill.
I tried this at home with a small piece of pork fillet. I cooked it for about 30 min at 65-70°C and then I quickly fried it in a pan: it was great, really tender!
Congratulations from an Italian fan of this blog!
also perfect for fish (lower temp. of course).
and a small edition to the technic:
at a restaurant i used to work for the water bath had small propeller to get the water circulating, this helps bring the meat and fish up to the desired temperature quicker, which is impotent in a restaurant setting where time really counts. but this isn’t as impotent for the home cook i guess (i never bothered)
[…] Wrestling with what to write today, I came across this fantastic post over at blog.khymos.org. It provides a simple, at home version of sous vide, which will provide a perfect, consistently cooked piece of meat. I’ve recently noticed a huge increase in sous vide on Iron Chef America, so those of you who are fans can bring a little techno into your own kitchens. […]
Great article!! I’ve seen a huge increase in sous vide on Iron Chef America and have been wanting to attempt it in my own kitchen. Thanks!
I’ve linked to your article on my blog at http://www.theportlychef.com/blog and have included another method that I find results in “perfect” steaks. Love your site!!
Thanks for introducing me to your sous-vide technique — I just had to give this a try this weekend.
I had difficulties maintaining a precise 62-64C temperature, so I enlisted the use of a trusty crock pot (aka slow-cooker). I set it to HIGH for the first 30 minutes and then to “KEEP WARM” for another hour. I would recommend you “calibrate” your crock pot as I’m sure your mileage will vary. Cheers.
/D
Cooking plastic bags: yes, there are what we in Norway call “stekeposer” (oven roasting bags) made of polyester, in the supermarket they go by the name “Look Oven bags”. I found some info at http://www.terinex.co.uk/food_processing. I suppose, moisture from the food inside the bag will prevent the temperature going far past 100 degrees C although the oven is set far higher (200 deg C). Also, the water vapour inside the bag is a better conductor than the air outside, avoiding overheating.
Eran: yes – this also works for fish. And for some types of fish, you can even omit the plastic bag – put the fish directly into a pan of water which you hold at the desired temperature (typically 50-60 °C). BTW – The propeller in the circulation baths is there to ensure that the water bath has an even temperature throughout. It won’t make the fish/meat heat up much quicker (which shouldn’t be important anyway, because restaurants that use sous-vide typically cook the meat the day before in a sealed plastic bag, then they cool it and once an order comes in, they reheat it and brown the surface).
Thanks for this; it sounds like a fantastic technique.
A few quick questions to put out there:
– does this low temperature heating also allow for bacteria growth? I’m not too sure of the temperatures involved….
– if this is done beforehand, as martin lersch suggests, what temperature should it be stored at, once it has been heated up? also, other than ‘browning’ the outside, what sort of reheating needs to be done to ensure the steak, although perfectly cooked, is also hot enough throughout?
great tip though, thanks!
Adam,
without having all the temperatures at hand, I should be obvious that cooking fish at 50 deg C (or even lower) i also perfect for bacterial growth, so cleanliness is imperative. Increasing the temperature above 60 deg C and keeping it there is of course better. Also, searing the surface of the meat is a safeguard as microorganisms won’t be able to penetrate the meat (ground meat is a whole different ballgame, though).
The standard rule for storing meat is to cool as quickly as possible and keep it in the fridge (4 deg C). On reheating, I’d go for the same method and temperature as when cooking the first time, as overheating would ruin all the work you did in beforehand. Careful use of the microwave could maybe be a good alternative as heat is distributed throughout the meat more quickly.
Martin: maybe you’d take the effort of discussing sous vide cooking vs microorganism growth in a later blog post? I guess it has been investigated, but is seldom commented in connection with sous vide (to my knowledge, but my knowledge is of course rather limited not being a professional chef).
Using the oven as a regulator isn’t the best way to go. You really need accurate temprature controls, especially if you are using the SV method for fish. I also highly recommend you read the sous-vide thread on egullet which has many safety issues outlined.
http://forums.egullet.org/index.php?showtopic=39023&hl=sous-vide
I will definately try this. Look for a post on my blog.
Regarding safety: in the absence of oxygen, and at the low temperatures used for sous-vide, the bacterium Clostridium botulinum can certainly thrive. This bacterium produces botulinum toxin leading to botulism, a paralytic illness.
For the home cook I would therefore recommend sous-vide preparations to be consumed the same day they are prepared. It’s also a good idea not to exaggerate – leave cooking times of more than 12 hours to the professionals. Cleanliness is paramount and remember to keep the meat well refridgerated until cooking.
The growth of Clostridium botulinum bacteria is disfavoured by a low pH. This is is easily achieved by addition of some vinegar or lemon juice to the plastic bag. When preparing a piece of meat, it can be helpful to know that the bacteria sit on the surface of the meat. You can easily disinfect the surface by wiping it with a piece of paper dipped into vodka or some other strong alcoholic drink.
[…] I have previously written about how you can cook a perfect steak with a simple DIY sous vide technique. Of course low temperature cooking applies equally well to fish with the only difference that the temperature can be turned down even lower. […]
[…] blog.khymos.org » Blog Archive » Perfect steak with DIY “sous vide” cooking (tags: sous vide recipes howto food cooking recipe method) […]
DIY sous-vide for cooking steak…
A do-it-yourself approach to sous-vide without the need for cryo-bags and an immersion circulator. The results look very good, a steak that’s wonderfully browned on the outside and uniformly pink throughout….
I am a sales rep who makes these sous vide circulators for the temperature control we are running big specials right now on both our units and offer a demo model to customers who are interested in trying out a unit. Call me 800-225-9243 Ext 323
Hi great article, just a quickie you may have heard of heston blumenthals alternate version of this. http://www.theanswerbank.co.uk/Food-and-Drink/Question322196.html he keeps his steak at the temperature for 24 hours. what is the optimum time using the sous vide method
many thanks
The result you obtain will be a function of both temperature and time. I recently discovered that Nathan Myhrvold has a number of great posts in a thread at eGullet. I’ll recommend you read up on the details there, and perhaps I’ll post a summary at Khymos as well.
You may laugh at this, but I tried it this weekend when I was brewing beer. We mash the grain at about 150 degrees for most of an hour, and temp control is crucial. I figured I had some grain/water mash at 150 degrees and I had some steak, so I tossed the bags into the mash tun, let sit about 45 minutes, and grilled the steak while I was sparging. It came out great, especially when the 150 degree heat really woke up the mini peppers I had chopped up and dry rubbed into the steak.
Beer and steak go so well together, now you can cook them together, too.
How would this work if you were to pre-grill the meat to brown it, then seal it once chilled? I am looking for a way to get the browning effect, then cook the food in the bags, chill it and hold it for as long as possible. Of course, taste, texture and safety are the main imperatives. Any Ideas out there? So far SV is the best looking way I’ve come across to achieve what I am looking for.
Tom,
Best bet is to cook sous-vide first (for medium cook 30 minutes at 140), then grill it for 1 minute each side to sear the top and give it good grill marks.
[…] Here is an article on sous vide in the home kitchen, I used basic equipment and had no trouble whatsoever (except for the bag issue, which is addressed in the article) I’m happy to see steak works well and I really like the browning quickly on the barbecue idea. […]
French scientist have detect a gene that stops the process that maturates the meat:
http://www.physorg.com/news108308646.html
Since nearly all plastic bags (especially those commonly found in kitchen drawers) are actually not entirely waterproof, is this a concern? That is, won’t there be some (small) amount of water that leaks into the bag and some amount of meat juice that leaks out?
No. To prove this – if you fill a bag with water – is there really much water leaking out?
I would be more concerned about plasticizers leeching from the plastic bag. If you can find them – use bags which are intended for cooking.
Gee… they just reinvented canned meat. Place meat in sealed container with seasoning, heat, open, use. They just did it for short term storage. Not long term. This method has been used by farmers and farmer wifes pressed for cooking time for generations.
Peggy
margaret: You miss one important detail here 🙂 Canned meat is cooked at 100 °C whereas sous-vide meat is only taken up the temperature which gives the meat it’s desired doneness.
>You miss one important detail here
Is it a certainty that nothing is leeching out of the plastic bags? We have heard warnings about dioxins in plastic wrap and such. Would like to try this but still have reservations about toxicity.
Tom: You’re right to be cautious. When I did this I went to the grocery store and got some of those plastic roasting bags that they sell for poultry. They’re designed for higher temperatures than this and are considered safe. However, most plastic bags are *not* safe, and will leach — Ziploc bags are not safe, for example.
I really want to try this. My butchershop can vaumize the meat for me. Can I throw this vacuum package into the 60 degree water, or will this cause bacterial problems? Do I have to unpack and put it in a fresh bag, not vacuum?
Sorry: vaumize = vacumize
[…] Dank wie so oft an blog.khymos.org! […]
[…] tried out an idea from Khymos recently when inviting a bunch of friends over for a party. We took six slices, about 1100g, of […]
Has anyone tried this with a (relatively cheap) deep fat frier, rather than a (relatively expensive) water bath? I have done some measurements with mine and it seems to be able to maintain water at 60-67 C. Is this accurate enough for this method?
I just tried this last night, with a 12oz Sirloin for 45 minutes at 60C. It worked beautifully. The one weird issue is that the meat seemed to require much more salt than meat normally does when I cook it. I suppose that this is because the salt content of the juices was nearly unchanged by evaporation. I suggest a heavy application of salt during the seasoning so that it might penetrate to the center.
I maintained the temperature by placing a small bowl in the bottom of a large pan, filling with water, and then placing a steamer top from a smaller pan so that it rested on the bowl. (This was intended to create a somewhat closed environment which was raised up from the heat source, giving me fine control over the temperature.) Then I placed the probe thermometer in the steamer, and followed with the steak in a Hefty brand oven bag. I set the thermometer to beep at 61C (for a target temperature of 60C). It took a little bit of calibration, but I found that I could set the temperature slightly too high to maintain 60C. Then every 5-10 minutes, the thermometer would beep. At that point, I would slowly add some cold water (the colder the better) to the surrounding water (with liberal stirring) until the temperature just barely changed to 59C. In this way, I was able to keep the temperature in a very close range of slightly more than 1 degree centigrade. This was very impressive to me, given how bad my stove is. I think the keys to fine control are: low heat and a large volume of water. I think it works better to start out with a stove setting that is much too high (maybe medium-low) and reduce it every time the timer goes off by a small amount.
The pot I used was about 2 gallons, with an ambient room temperature of 23C.
I don’t understand why it “originally” was vacuum sealed? I realize it’s important that the meat gets in close contact with the surrounding water, and therefore it’s good to remove as much air as possible to improve the heat distribution. But from that to vacuum pump?
I’m convinced this method is sound, but I’ve tried it twice now and both times with slightly disappointing results. I used my oven to keep the water at a steady temperature, a thermometer to check, and even a meat thermometer to double-check the internal temperature of the meat just before frying. The first time, I heated the water to around 58 degrees c, left the meat in there for half an hour, then fried it for just a minute or two. But the result was almost entirely grey – just a small hint of pink in the middle. Not tough, but nothing like as rare as the temperature seemed to suggest.
So next time I only heated it to just above 50 degrees, again checked the internal temperature of the steak with a meat thermometer – it was the same as the water – and quickly fried. Still almost entirely grey – slightly more pink in the middle, but nowhere close to rare. Yet apparently the temperatures I’m using are almost dangerously low. Two different thermometers and my oven’s thermostat all agree on the temp of the meat, so I’m at a loss as to what might be going wrong.
The meat is visibly grey when I take it out of the water each time – should it still be pink? I could try leaving it in for less time – although I’m only doing it for 30 mins as it is. But I’m loath to try even lower temperatures.
Stefanie – I guess the reason is that vacuum sealers are ubiquitious in the food industry and are also found in many restaurants. So for these people, the easiest way to remove air would be to use equipment already present.
Pentadact – you don’t state which kind of meat you use. Different meats are done at different temperatures. And did you check/calibrate your thermometers?
Just tried it today, with absolutely terrible results. What happened was that the fluids leaked out of the meat, leaving a perfectly cooked but still bone dry steak.
Given the procedure, this result shouldn’t be surprising. I guess there’s a reason why professionals use vacuum packs – they leave the juices nowhere to go. With this method, it’s pretty difficult to seal the meat in tightly enough to prevent leakage.
Unless I’m missing something, of course. Which is very likely.
[…] nogal bewerkelijke techniek echter minder geschikt. De auteur van het kooklog voor nerds Khymos beweert weliswaar dat je op deze manier perfect een biefstuk kunt bereiden, de ervaring in huize Rommelhok […]
As per Martin’s request (he was kind enough to email me to figure out what I did wrong – imagine that!) here’s what I did to screw this up:
The bags used were three 1 liter “freezer” bags put inside each other
to prevent water getting near the meat. Some water leaked into the
outer bag but none in the second so I assume none leaked into the
inner bag that held the meat and that all the fluid that was in fact
in that inner bag came from the meat itself (which was, as I said,
perfectly cooked temperature wise – the structure of the fibers was
quite correct, i thought – it just was bone dry).
The meat was two pieces of entrecote, pre-browned, wrapped as tightly
as possible in the inner bag. “As tightly as possible” was not, in
fact, very tight at all.
The cooking temperature wobbled for about four hours around the 65
degree mark, never going below 62 degrees and never going above 68.
It wasn’t at all steady, but if I recall Harold McGee’s “On Food and
Cooking” correctly, these temperatures should be yielding something
around the just barely medium done mark.
The thermometer is reasonably accurate: it shows the temperature of
boiling water at about 35 metres above sea level to be 98 degrees.
If you can spot another error here besides not wrapping the meat
tightly enough, I’d be most obliged.
Of course I’m not in any way suggesting the method you describe on
your website is flawed – it isn’t. It’s just that it’s a process that
can easily go wrong if you leave the meat enough room to leak juice,
which is probably why professionals use vacuum bags.
===
To which Martin responded that the temperature was probably too high. When I use the “stick it in an oven for hours” method the temperature in question is fine, however. Martin suggests:
“If you want your meat well done with sous-vide, I guess you have to
aim at a lower temperature than you would with normal cooking, because
the time factor comes into play.”
I’m not sure 65 degrees counts as well done – I tend to like my meat not completely raw – but there you have it.
hi there
i just found your post on sou vide and though it was a great coincidence. i have been looking out for posts on vacum cooking all last week and found nothing (mind you, i was looking out on spanish…)
i have just posted a recepie i did with suckling pig confit on a vacum bag 12 hours at 160º F/ 70ºC!!! i have never tried such tender and moist meat
here’s the link to the post:
http://inigoaguirre.wordpress.com/2008/01/21/cochinillo-confitado-al-vacio-con-vinagreta-de-citricos/
and here’s the link of the whole meal: 5 different dishes done with different parts of the baby pig:
http://inigoaguirre.wordpress.com/2008/01/21/comida-operacion-cochinillo/
also, i’m sure this will definetly interest you. it’s the perfect device for cooking on a constant temperature for a long, long time:
http://auberins.com/index.php?main_page=product_info&cPath=8&products_id=44
cheers,
íñigo