Talking to a friend last year who is an avid home brewer made me realize how little I knew about beer and brewing. Inspired by what I learnt from the conversation I started reading Palmer’s How to brew which is essential for starters, but soon I also turned to Brigg’s Brewing – Science and practice and Priest’s Handbook of Brewing which are more rewarding if you’re a scientist. The first two steps in brewing beer – mashing and wort boiling – are really quite sophisticated extractions. And there is a lot of chemistry involved, so brewing beer seemed to me like an obvious extension of all my other interests. This is also the reason why I wanted to include a post about brewing in the Wonders of extraction series. The pictures for this blog post were taken as I brewed and bottled my latest batch, an American India Pale Ale.
Having read quite a lot about beer I soon found myself in the kitchen brewing my very first German wheat beer in August last year. I had decided that to familiarize myself with brewing I would try to brew with whatever equipment I had available in the kitchen. Mashing and lautering was done with a pasta strainer(!), and I boiled the wort in the largest pot I could find. While doing this it became very clear to me that these steps can be viewed as “reactive extractions”. Something is extracted and then something more happens! Given the simple method and equipment used I was totally amazed by the end result. And I quickly decided that this would not be my last batch of beer. After hours or reading (and making an important decision that I would like to spend my time brewing, rather than building the equipment) I finally settled with a Speidel Braumeister. This is a compact RIMS (Recirculating Infusion Mash System) type brewery system where a pump forces the wort upwards through the malt bed (different from a conventional RIMS system where the wort is allowed to drain through the malt bed by gravity). The picture below probably explains more than countless words.
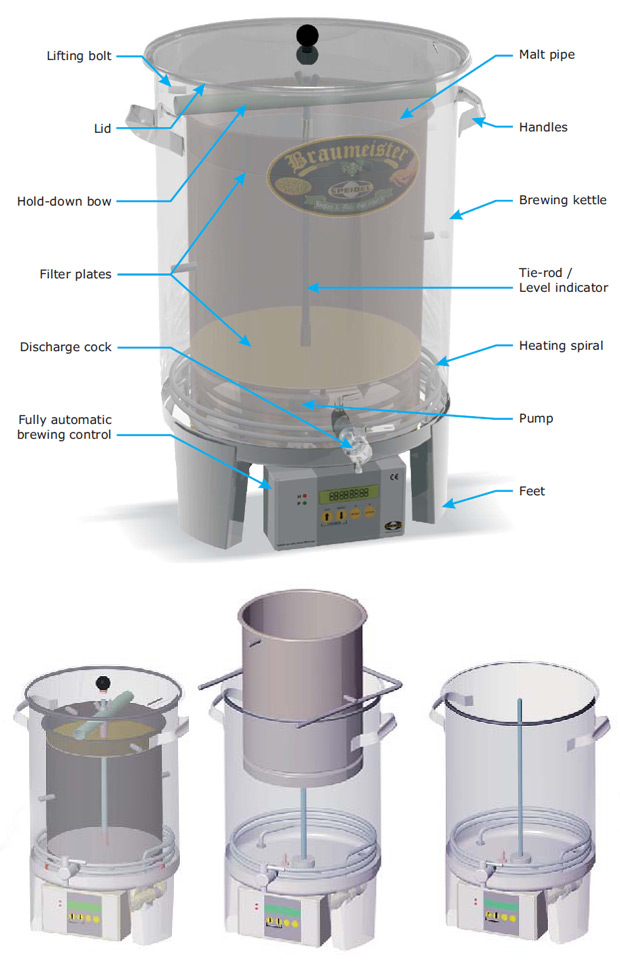
The Speidel Braumeister is a compact RIMS type brewing system. During mashing a malt pipe is inserted. A metal screen and filter cloth at both ends of the malt pipe hold the malt in place. A pump forces the wort upwards through the mash (bottom left). After mashing the malt pipe is lifted out to allow the wort to drip of (bottom middle). Extra water may be added to rinse out remaining wort. The malt pipe is removed prior to the wort boiling (bottom right). Illustrations taken from www.speidel-braumeister.de
What really attracted me to brewing is that the range of ingredients available to professional brewers is also available to home brewers. And while a commercial brewery will do what it can to cut costs, opting for cheaper ingredients whenever possible, the money spent on malt, hops and yeast doesn’t really matter that much for the home brewer. As a result one can actually brew some very nice beers at home. And a much larger range of beers than is available in your next door shop. I believe this is quite different from what is the case for home brewing of wine (at least in Norway where fresh grape juice in those quantities is not available).
The extraction of sugars from malted barley is termed mashing. During mashing one utilizes the enzymes naturally present in grains to break down the starch to fermentable sugars (meaning sugars that the yeast can convert to alcohol). It sounds simple, but the process involves a number of enzymes with different temperature and pH optima. And one needs to do a couple of tricks for the enzymes to appear, so I will start with a brief introduction to malting (but feel to skip this and continue reading about mashing further down).
Malting
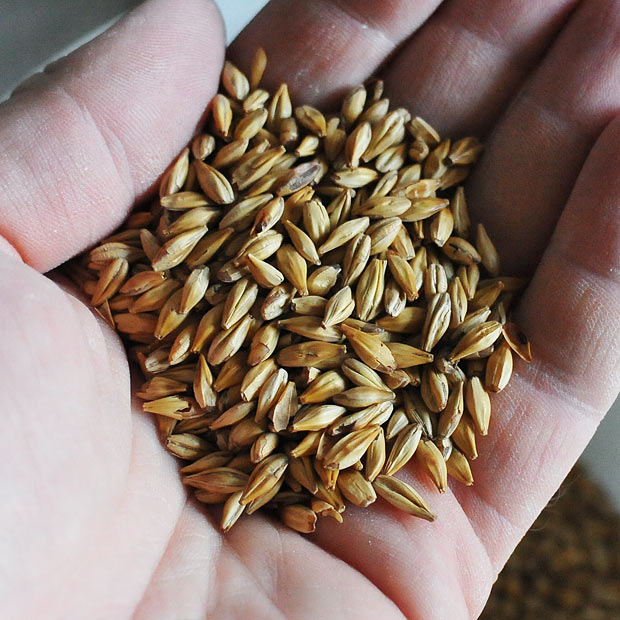
When a barley seed is wetted it will start to germinate. The release of the plant hormone gibberellic acid in the seed embryo sets of the synthesis of proteins capable of breaking down starch to sugar which will be needed for the seed to grow. These proteins are called enzymes, and they are extremely efficient at breaking down starch to sugar. After a couple of days the sprouted grain is air dried. As the water content decreases a second plant hormone, abscisic acid, is released. The effect is the opposite of gibberellic acid, and the synthesis of further enzymes is halted. The lowered water content also stops the enzymatic breakdown of the starch. The air dried green malt as it is now called is further kiln dried. The small amount of liberated sugar alongside the proteins allows for the Maillard reaction to proceed if the conditions are right, resulting in characteristic malt and caramel flavors as well as colors ranging from golden to brown and almost black. The darker the color of the malt, the less will be left of the enzymes required for starch hydrolysis (but this is usually not a problem as only a relatively small amount of very dark malt is used). Some enthusiasts malt their own barley, but most home brewers buy whole grain malt.
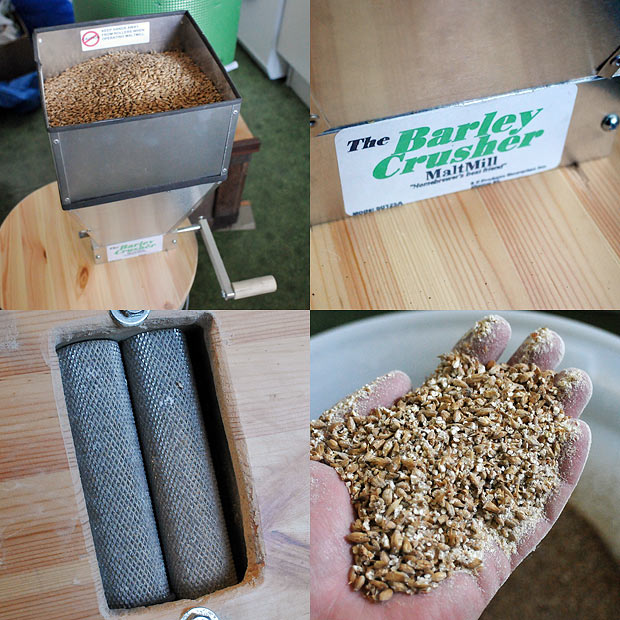
The hopper of my malt mill filled with ~5 kg malt is ready for some action (top left). As the grains pass the two rollers (bottom left) the malt is carefully crushed (bottom right). If crushed too fine the result is a “stuck mash”, if crushed too coarsely less sugar will be extracted and the yield drops.
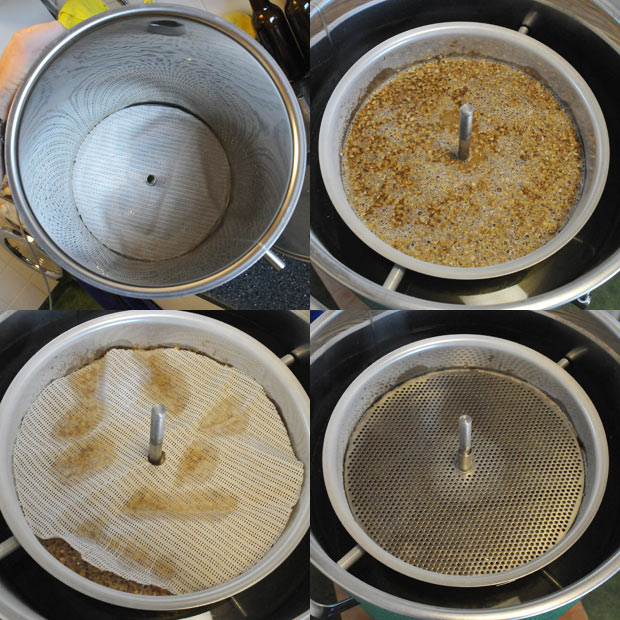
Bottom screen and filter cloth inserted into the malt cylinder (top left) which is then lowered into the water filled brewing pot, crushed malt is then poured into the malt cylinder (top right), covered with a filter cloth (bottom left) and a metal screen (bottom right).
Mashing
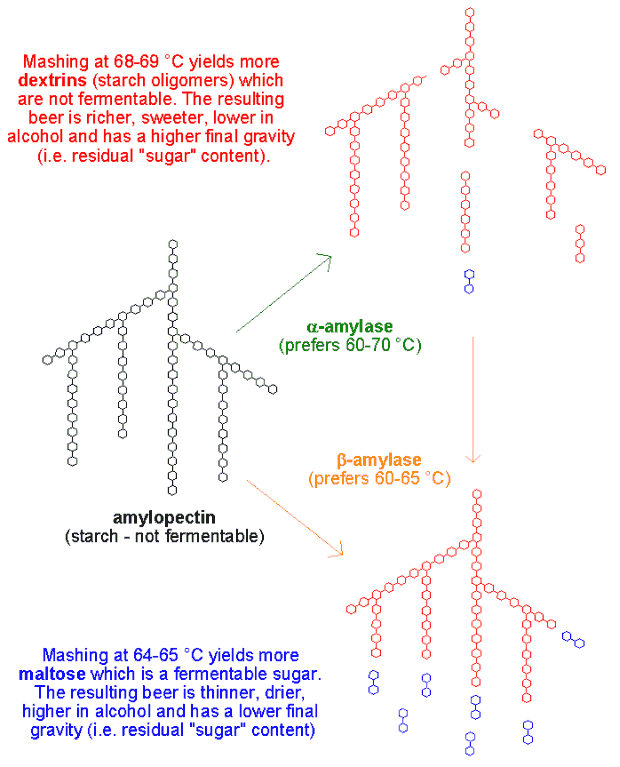
The malt now contains starch as well as the enzymes required to break down the starch. When water is added and the temperature brought up to around 65-67 °C the enzymes start doing their job which is to break down the starch to sugars. This step is called mashing. Several enzymes are at play, but I’ll focus on the two most important: alpha-amylase and beta-amylase. Alpha-amylase is more temperature stable, attacks and breaks up the starch polymer at random places, resulting in smaller starch molecules known as dextrins. Only a very small fraction of the starch is converted to fermentable (= usable for the yeast) sugars by alpha-amylase. Beta-amylase on the other hand is less temperature stable but breaks down starch to maltose which is fermentable. By carefully choosing the mashing temperature the relative activity between alpha- and beta-amylase can be fine tuned. Mashing at 64-65 °C favors beta-amylase which yields a wort higher in fermentable sugars, resulting in a beer which is thinner, drier, higher in alcohol and has a lower final gravity. Mashing at 68-69 °C favors alpha-amylase which yields more dextrins which are not fermentable, resulting in a beer with more body which is sweeter, lower in alcohol and has a higher final gravity (i.e. residual “sugar” content). This may be confusing but trust me – it’s even more confusing when John Palmer tries to explain it with a garden allegory! I encourage you to check out the figure below which may help clarify things. After mashing is complete the temperature is increased to 78 °C to inactivate the enzymes. The malt pipe is then pulled up to allow the wort contained in the malt bed to run off (termed lautering). The malt bed may be washed with 78 °C water (sparging) to increase the yield.
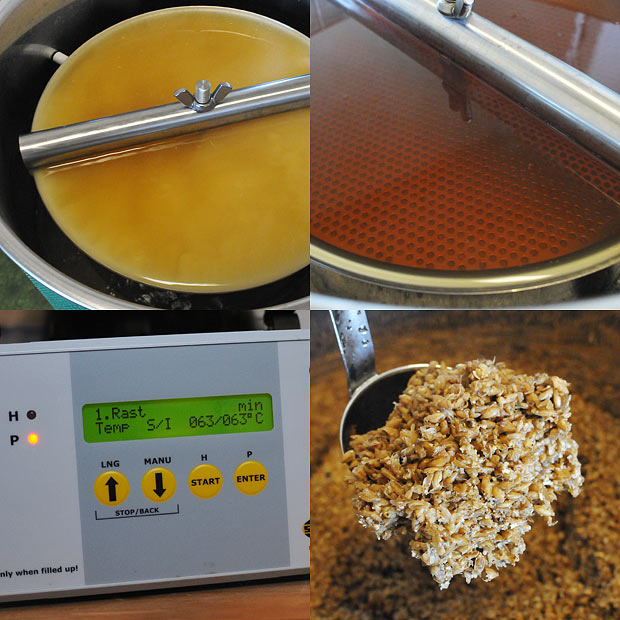
The wort is circulated upwards through the malt bed throughout the mashing time. At first the wort is very cloudy (top left) due to the fine particles from the crushing. The malt bed acts as a huge filter which helps remove particles, yielding a clear wort (top right). The time and temperature steps are controlled by a PID (bottom left). After mashing the malt cylinder is pulled up, the wort is allowed to run off (termed lautering) and the malt bed may be washed with water (sparging). The malt that remains is known as wet distillers grain (bottom right) and does wonders to your compost! Or you can use some of it for baking a special bread called treberbrot (named after the German word for spent grain).
If the extractable yield of a malt was 100% and the mash efficiency was 100% 1 kg malt would yield 1 kg of sugar in the mash. However, the extractable yield for a pale malt is about 80% (the hulls for instance are not extractable), and in my last brew I reached a mash efficiency of 78%. In effect I got approximately 624 g of sugar for each kg of malt.
Wort boiling
After mashing and lautering the wort is heated further and kept at a rolling boil for about one hour. There are several reasons for this. First the mashing enzymes are destroyed. Another one is to sterilize the wort (i.e. kill off unwanted bacteria and yeasts) prior to the following fermentation. Furthermore the boiling will allow some unwanted volatiles such as dimethyl sulfide to escape. The boiling will also facilitate the precipitation of proteins, resulting in a clearer beer. But perhaps most important for the resulting taste of beer is the addition of hops to the boiling wort. Hops are a kind of flowers that impart a bitter taste and in some cases also a significant aroma to beer. The bitterness balances the sweet taste of the wort, and the hops also stabilize and increase the shelf life of beer due to a mild antibiotic effect against bacteria that could otherwise ruin the beer.
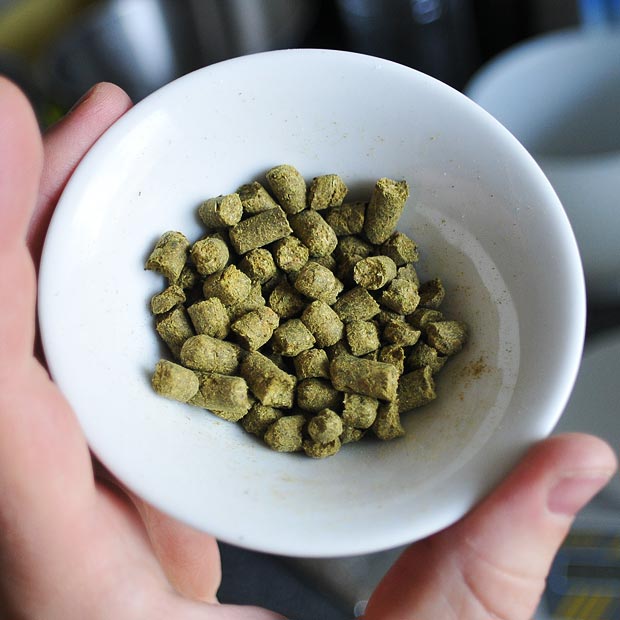
Hops are typically added as whole cones or pellets as shown here. The pellets are crushed hop flowers that have been compressed for easier addition. Once added to the wort the pellets fall apart. The larger surface area of the fines results in a faster extraction of the alpha acids.
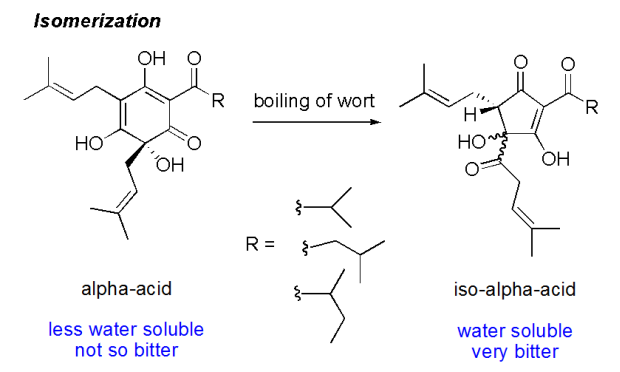
The hop cones contain alpha acids which are not particularly water soluble, and in fact not very bitter either. But when boiled they undergo a chemical change which makes them more bitter, the so called isomerization (shown below). Hops that are added for bittering of beer are typically added to the wort once it starts to boil as the extraction and isomerization processes takes some time. The extraction of alpha acids and the isomerization process are well studied and brewers can accurately predict and design the bitterness of a beer using online calculators. Required input data are wort volume, wort gravity (i.e. sugar content), alpha acid content in the hops and boil time as well as whether the hops are added as whole flowers or as fines compressed to a pellet. The hop bitterness is expressed in International Bitter Units (IBU), typically ranging from light lagers or wheat beers with 5 IBU up to India Pale Ales with 100 IBU or more. Those with access to a spectrophotometer can measure an approximate IBU of a beer by recording the absorbance at 275 nm and multiplying the number by 50 (IBU = A275 x 50).
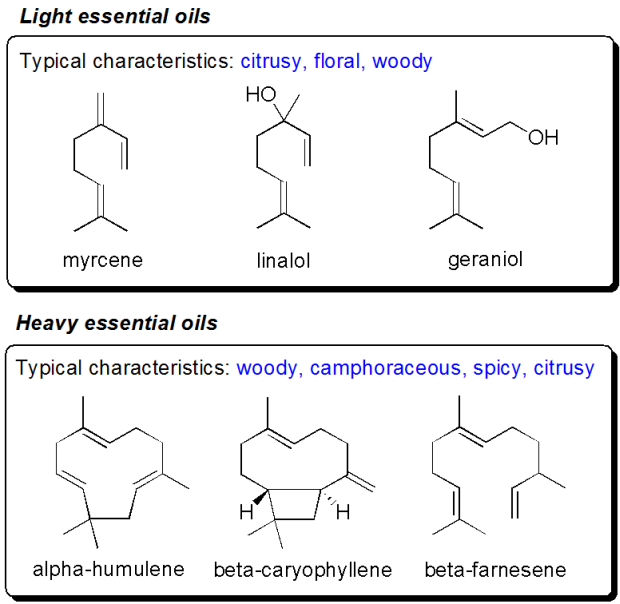
In addition to alpha acids hops also contain essential oils, some lighter, more volatile (primarily terpenes such as myrcene, linaol, geraniol, limonene, terpineol etc. – typically with a citrusy, green, grassy, floral aroma) as well as some heavy, less volatile oils (humulene, caryophyllene, farnesene – typically with a woody, spicy aroma). When smelling fresh hops it’s primarily the essential oils that make up the aroma. The majority of volatiles are lost from the boiling wort due to evaporation. However, if hops are added towards the end of the boil the less volatile oils will remain in the wort and in the resulting beer and impart a significant hop aroma to the beer (not to be confused with the bitter taste which results from prolonged boiling of hops). In some cases hops are even added to the wort during of after fermentation, so called dry hopping. This allows the extraction of the lighter volatile essential oils in the hops. In order to capture the lightest volatile oils it’s important to use fresh hops (i.e. hops that have not been dried). To complicate matters further many of these essential oils are quite reactive towards oxygen, and if digging deeper into the molecules behind a “hoppy” aroma one will find several oxidation products of the essential oils.
Here I should add that chefs probably could learn something from the early and late addition of hops to the boiling wort. I have a feeling that the early vs. late addition of spices and herbs has not yet been explored sufficiently. And just like the same hop contributes different “fractions” of its flavor depending on when it is added I also think that spices and herbs could contribute a broader range of aromas if they were not added all at once. I would be very interested in hearing your opinions on this! And hereby I also share an idea for a nice science project: Boil herbs/spices, take samples regularly and see how concentration changes with time. When does it reach a maximum? This would be very useful information for chefs!

The wort is boiled (top left) for several reasons, one is to extract and isomerize alpha-acids from hop cones into iso-alpha-acid which provide the important bitterness to beer. After boiling cold water is passed through a copper spiral (top right) to rapidly cool the wort (bottom left). After cooling the gravity (i.e. density) of the wort may be measured with a hydrometer (bottom right).
Towards the end of the wort boil some brewers also add some Irish moss to help clarify the wort. Interestingly this moss should be well known to the readers of Khymos, albeit in a slightly different form – namely as a white powder sold under the name carrageenan!
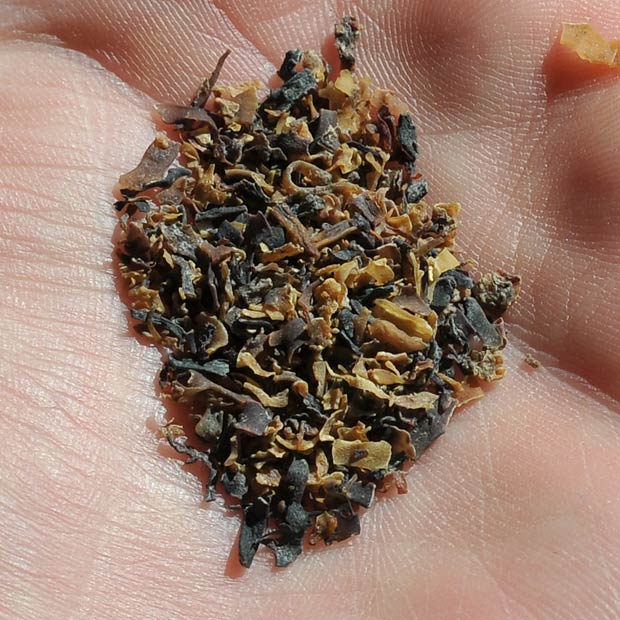
Dry Irish moss contains more than 50% of the polysaccharide carrageenan. When used in brewing the moss is wetted and allowed to hydrate before it is added added to the boiling worth the last 10-15 min.
The rest of the brewing process does not involve extractions, and hence is not the main focus of this blog post. But I’ve included some pictures to give you an idea of the different steps:
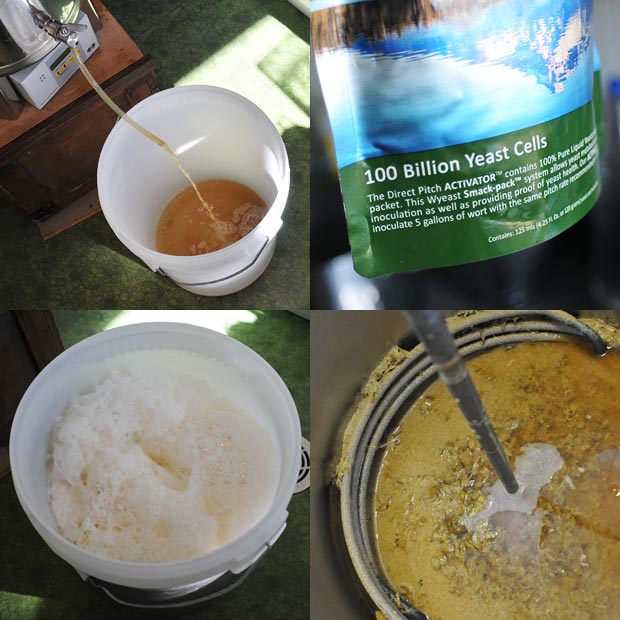
The cooled wort is sprinkled (top left) into the fermentation bucket to expose it to oxygen. For extra oxygenation an aquarium air pump can also be used to aerate the wort, resulting in some foam (bottom left). The added oxygen allows the approximately 100 billion yeast cells (top right) to grow/multiply before they move into anaerobic mode to produce ethanol from the wort sugars (primarily maltose). Proteins and hop residues are carefully left behind in the boiling vessel (bottom right).
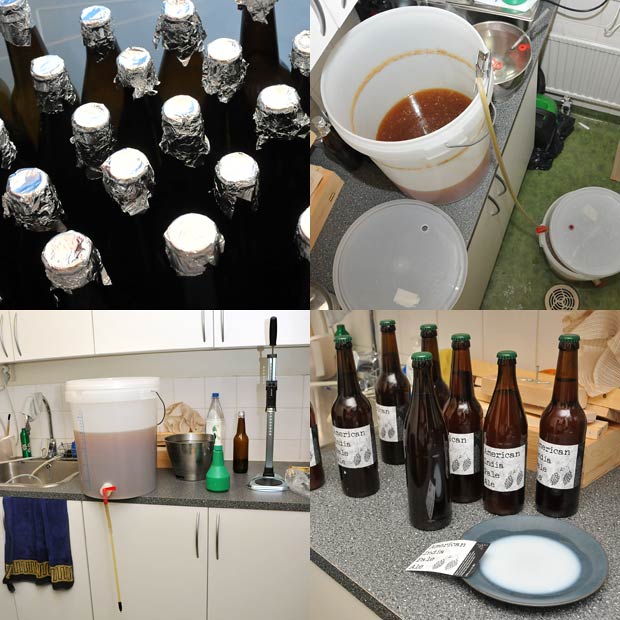
Clean bottles are covered with aluminum foil prior to dry sterilization (top left). The fermented (and in this case dry hopped wort) is siphoned (top right) into a second bucket where it is mixed with the priming sugar need for bottle carbonation. The bottling device used here (bottom left) has a small valve which only opens once the bottom of the bottle presses against it, thereby reducing foaming during bottling. Labels are glued onto the bottles with milk.
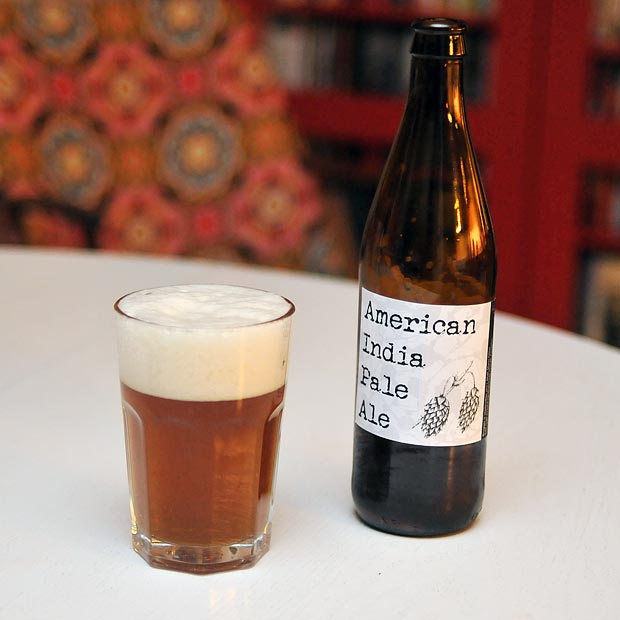
After a minimum of 1-2 weeks bottle fermentation the American India Pale Ale is sufficiently carbonated for the very first tasting!
Previous blog posts on the Wonders of Extraction
Wonders of extraction: Water
Wonders of extraction: Ethanol
Wonders of extraction: Oil
Wonders of extraction: Espresso (part I) (sorry – no part II yet…)
Wonders of extraction: Pressure

A much awaited blog post indeed, for the MG interested beer enthusiast, I suspect we are quite a few. I hope you follow up with a post on the mystic life of beer in the fermentation tank (and bottle). And just a tip i picked up from another home brewer: why not motorize the malt mill with a drill?
Thanks 🙂 Well – fermentation is so much more complex, at least when you look into the flavors and the differences between yeast strains …
Yes, I could probably save a couple of minutes with a drill. But the crank gives me a nice feeling that I’ve actually put in some work for the beer 🙂
Twitter user @brhau let me know that Sam Calagione from Dogfish Head Brewery came up with the idea of “continous hopping”. Here’s a quote from a 2008 essay about Dogfish which appeared in The New Yorker:
Brewing suggested to me that late/early spice addition would probably make sense in the kitchen as well. Cooking suggested to Calagione that continuous hop addition would make sense for beers. Isn’t it strange how the ideas in brewing and cooking can be mutually inspiring?
[…] Martin at Khymos does his usual awesome job with a post about beer and flavor extraction. […]
Thank you for another interesting post! Also for the explanation of dry hopping. It’s the time of year for cider tasting and last month I tried Finnriver’s Dry Hopped Cider which was unlike any cider I’d tried before – very floral! And now I know why.
A beautiful post 🙂 Very clearly put as well. Thanks
1) I guess that mashing temperature is also a critical point in terms of what product you get(?) I heard once from a home brewer that in past times some home brewers learned that you should swirl the mash tun 10 times in a certain direction. Some younger brewers thought this was too strenuous and skipped this step, but then ended up with a different beer. This was explained by swirling process cooling down the mash somewhat during the process. Might be a myth, though
2) excellent illustration of the alpha + beta amylase processes.
Thank you for the kind comments!
About swirling: Yes – home brewers some times utilize a whirpool to speed up settling of particles. This gives a clearer end product.
Martin, thank very much- so interesting post!
Where you purchased Irish moss- I didn’t found it in any virtual shop?
Are you mean to make a rye/maize beer too?
Are you feel difference in taste and scent of hops from different regions ( from England, Germany, Czech)?
Irish moss can be found in most homebrewing shops.
I currently have no plans for rye/maize beer… But will of course not exclude it 😉
Yes – there are big differences between hops, and I’ve only just begun on the long journey it is to familiarize myself with the many different hops available.
Thank you . meanwhile I purchased Irish moss from raw eaters shop in UK, but i wondered -how you can use it brewing : it has a so strong “fishy-sea” taste and odor?
may be, brewery shops hold especial kind , previously purified.
You typically add maybe 5 g to 23 liters of wort – there’s no problem then with a fishy taste/odor.
What a great treatise on extracting and mashing. Over the years I’ve gotten lazy in my home brewing and allowed to much variation in control of the process. Although my brews have been acceptable, I’ve found them to be slightly off at times, I’m absolutely sure this due to my lack of attention to temperature and time. Thanks for making me rethink my process.
I also have been informed by readings at sacredrice.com of how just a few degrees in temperature can truly affect the results of how rice (another starch and beer adjunct) quality and texture are determined.
Sometimes we wonder why we don’t produce that restaurant or commercial quality and it really is in the details.
[…] find more detail on enzymes and the mash process in this BYO article about mash temperatures or this one about extraction from […]